Operation
Local Operation
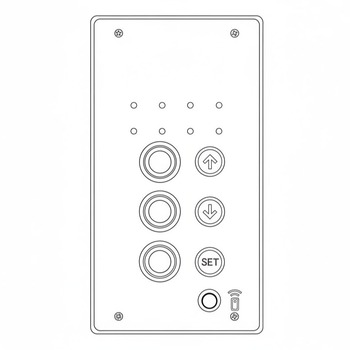
Controls for local operation of the gate can be found on the front of the controller enclosure. Unlatch the smaller outer enclosure to reveal the control buttons.
Lowering the Gate Arm
-
Ensure the gate travel path is clear.
-
Press the
DOWNarrow button. The roadway lights and bell will activate shortly before the arm begins to move. -
The lights and bell will remain on when the gate is in the down position.
Raising the Gate Arm
-
Ensure the gate travel path is clear.
-
Press the
UParrow button. -
Wait for the arm to stop moving and the roadway lights and bell to turn off.
Remote Operation
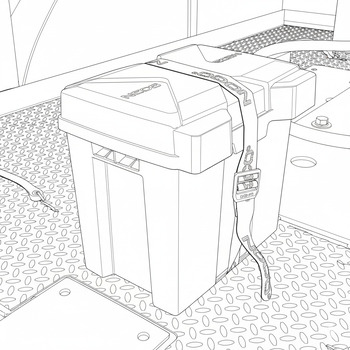
The crossing gate remote and wireless charger are stored in an attached weatherproof enclosure for operator convenience.
Seal Enclosure
Always double-check that the enclosure is closed and the strap is tightly secured to prevent weather damage.

Wake Remote
The remote will automatically go into sleep mode after 30 seconds to preserve battery life.
-
Press any button to wake the remote.
-
Remote will return to sleep mode after 30 seconds if no buttons are pressed.
Viewing List of Paired Crossings
-
Press and hold the
SETbutton for 2-5 seconds. -
LEDs will flash blue when viewing mode is active.
Crossings and Crossing Groups
The Portable Crossing Gate System allows for the programming and control of multiple crossing groups using the remote.
-
In viewing mode, the top row of LEDs indicates the active group, while the bottom row indicates the number of crossings in that group.
-
Use the arrow buttons to cycle through groups.
-
Crossings are listed in binary, with the number of the group and crossing indicated by the number of illuminated LEDs.
Pairing a crossing
-
Hold the
UParrow button to enter teach mode. -
The LEDs will flash yellow 3-4 times to indicate teach mode is active.
-
With the remote in teach mode, bring it next to the local controller on the crossing you want to pair.
-
Press the small pairing button on the bottom right corner of the local controller to send a pairing signal.
-
When the crossing is paired, the remote LEDs will flash yellow.
Grouping
Ensure that opposing crossings are paired in the same group.
Lowering the Gate Arm
-
Ensure the gate travel path is clear.
-
Ensure the correct crossing gate/group is selected.
-
Press any button once to wake the remote.
-
Press the
DOWNarrow button. The roadway lights and bell will activate shortly before the arm begins to move. -
The lights and bell will remain on when the gate is in the down position.
Raising the Gate Arm
-
Ensure the gate travel path is clear.
-
Ensure the correct crossing gate/group is selected.
-
Press any button once to wake the remote.
-
Press the
UParrow button. -
Wait for arm to stop moving and the roadway lights and bell to turn off.